You must be signed in to read the rest of this article.
Registration on CDEWorld is free. You may also login to CDEWorld with your DentalAegis.com account.
Restoration of a patient's maxillary dentition using an implant-retained overdenture is a predictable clinical procedure that is often mired in confusion when evaluating restorative approaches and methodology. When used to restorae the mandibular dentition, the stud-style two-implant overdenture has shown high degrees of patient satisfaction and long-term success.1,2 In contrast, the maxillary arch presents unique challenges when restoring with stud-style abutments.
Treatment of patients with maxillary overdentures using both splinted and unsplinted designs has been shown to be successful in both short-term and long-term studies.3,4 Patient satisfaction metrics have also shown that maxillary overdentures are a well-accepted treatment option for the edentulous arch; interestingly, over a moderate-term length, patients treated with maxillary overdentures are as satisfied as those treated with fixed prostheses.5
Long-term survival rates of dental implants on the maxillary and mandibular arches reveal unique potential challenges for maxillary overdenture treatment. Bone quality and quantity on the maxillary arch is much lower than on the mandibular arch for most patients. As a result, overall long-term success of maxillary implant treatment remains lower than that of the mandibular arch.6 The edentulous maxillary arch tends to have much lower bone density and, due to anatomical features such as the maxillary sinus and nasal sinus, shorter implant length may be needed than in other implant sites. Protocols have been established that include using dental implants with moderately rough surface properties, minimizing parafunctional forces, appropriating natural dentition, and using a greater implant number in compromised cases.7
A general consensus exists on the implant number for maxillary overdenture treatment, with recommendations of at least four implants widely spread around the arch. Distribution and implant number has been shown to be important for physical properties of the denture prosthesis.8-9Anatomical features, such as the maxillary sinus and inferior alveolar nerve, may limit the ability of the clinician and technician to be able to utilize a wider distribution of dental implants.
Historically, implant overdenture design relies upon the ability of the prothesis to maintain a rotational point within the attachment system that permits antero-posterior and oblique movements. When the patient inserts and removes the prosthesis, the rotational capability of the attachment system is an important factor for being able to maintain a unique path of placement of the prosthesis even when implants are in divergent positions. Clinicians and technicians want to control off-axis implant positions and provide a functional restoration using abutments that permit an enhanced rotational capacity. The use of a bar in combination with stud-style abutments is an option for control of off-axis implant positions and provides parallel retentive elements.10 Furthermore, the splinting effect can assist clinicians in treating patients with limited bone quality and quantity on the maxillary arch by placing implants in positions that normally would be challenge to restore with stud-style abutment systems.10
Many clinicians and technicians often use stud-style abutments-such as a LOCATOR (Zest Dental Solutions), Stern ERA (Sterngold Dental), and OT Equator (Rhein83)-due to simplicity related to clinical and technical factors. Prosthetic space requirements are an important factor related to abutment choice selection. Stud-style abutment overdentures typically require 9 mm to 11 mm from the incisal edge of the prosthesis to the top of the implant platform, whereas bar overdentures typically require 13 mm to 15 mm.11,12 Bar overdentures often require additional metal frameworks inside of the prosthesis to add strength, which further increases the amount of space required within the prosthesis.13 As the technician increases the bar height or length to help strengthen the prosthesis, it may lead to excessive bulk within the prosthesis, especially when combined with Hader- or Dolder-style retentive elements. As a result, some clinicians and technicians prefer using individual solitary stud-style abutment systems to restore maxillary implant overdentures.
Splinted implant overdenture restorations tend to show lower implant complication rates compared to stud-style abutment systems.14 Others have found that even with a modestly higher complication rate, patients greatly prefer prostheses with less bulk, enhanced cleansibility, greater simplicity, and less maintenance concerns-all of which is achievable when a stud-style abutment system is utilized. Furthermore, others have indicated that patient satisfaction is not significantly impacted by splinted versus non-splinted design when stud-style abutments are utilized.15
Clinicians and technicians often face a dilemma involving how to properly design a maxillary framework for implant overdentures. The aim of this article is to discuss general framework design parameters for bar and stud-style implant overdenture restorations.
Bar Overdentures
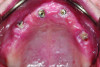
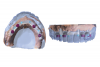
Based upon the aforementioned factors of prosthetic space, splinting, and bone density, a clinician and technician together should make the decision whether a patient is a good candidate for a bar overdenture. After the implants are placed according to anatomical features that permit adequate distribution and angulation, the patient often presents with healing abutments in place ready for impression procedures (Figure 1). Screw-retained abutments are placed and a traditional PVS impression is made. In the laboratory, metal analogs are placed and the impression is poured in dental gypsum (Figure 2).
Bar overdenture design relies heavily upon knowing the prosthetic relationship of the dental cast to the prosthetic tooth goals.16 Having an approved prosthetic tooth arrangement try-in completed prior to designing the bar framework is essential to the success of the bar overdenture case as the try-in permits the restorative plan to be the guide for the technical procedures to ensure the completed bar fits within the confines of the restoration. Far too often, one can travel to a dental meeting and see countless numbers of dental casts with extensive-looking maxillary frameworks yet no prosthetic tooth plan. This can potentially result in a slippery slope where overly complex framework designs seem preferable by technicians when studies show that simpler designs are preferred by patients.17
The definitive cast and the prosthetic tooth arrangement (or waxup) are optically scanned and imported into CAD planning software to design the bar framework. During the design process, the prosthetic tooth position is confirmed and helps guide the framework design (Figure 3). Aforementioned design principles are employed to design the bar framework including maximizing anterior-posterior positioning of the retentive elements and ensuring the bar height and width are a suitable thickness to ensure long-term strength. The optimal design of the bar framework depends upon the restorative material chosen for the bar framework itself, with commercially pure milled titanium bars requiring greater width and height parameters than stiffer milled cobalt chrome materials. Cantilever lengths should be limited, with general consensus of lengths no more than 150% of the distance from the middle of the most anterior screw to the posterior aspect of the most posterior implant platform, known as the A-P spread.18 If a polymer framework is utilized for the bar overdenture, cantilever lengths should be limited to no more than the distance of the A-P spread. If a cast metal framework is to be utilized, the temptation for many technicians is to keep the bar as thin as possible to minimize alloy costs; however, ensuring proper thickness of a cast material will maximize long-term strength.
When planning on retentive elements within the bar design, a goal is to have at least four on most maxillary cases. Factors that may minimize that number are limited A-P spread, low bone density, short implants, and patients with parafunctional forces.19 Many clinicians and technicians tend to favor an even number of retentive elements to help stabilize the forces equally throughout the arch. Odd-numbered retentive elements present on an implant overdenture may impart an uneven, wobbly, joint-like rotational force on the bar framework. While cantilever length ideally is minimized as much as possible, placing retentive elements on the cantilever can be performed to ensure a wide distribution of the retentive elements.
While modification of the design is dependent upon the proposed prosthetic tooth position, bar frameworks should generally follow the alveolar ridge anatomical structure, rather than be arbitrarily designed. Keeping the bar design within the alveolar ridge proper gives the patient enhanced potential to properly maintain the prosthesis. Patients with alveolar defects, such as maxillofacial patients, however, may require larger and longer frameworks because of anatomical structures obliterated due to resection. Placing the bar at least 1 mm above the soft tissue margin will ensure the patient can maintain the bar while in function. When prosthetic space is limited, however, many technicians are forced to decide to "cheat a little" by placing the bar closer to the tissues versus making hygiene and maintenance more complicated for patients. Also, bars that rely upon additional stud-style retentive elements or Hader/Dolder retentive elements do not need any taper on the exterior portion of the bar to enhance retention and stability of the prosthesis as the retentive element provides most of the retention and resistance to dislodgement.
After the bar has been fabricated via reductive manufacturing methods, such as milling, individual stud-style systems can be fixed to the bar using a variety of methods. Many technicians prefer to use a drill tap to place a threaded portion within the bar framework where a retentive element can be torqued into position. Many stud-style abutment systems have prescribed threaded parts that can permit simple placement of the retentive element. Alternatively, systems that permit welding can be placed using a laser weld to join the retentive element to the bar framework. Laser welding is very predictable for cobalt chrome frameworks but less predictable with titanium frameworks. Polymer-based frameworks can utilize a hybrid approach of a drill tap and resin cement to adhere the overdenture retentive element.
After the bar has been fabricated and retentive elements placed, an additional, secondary suprastructure covering the bar framework is highly recommended for many bar overdenture cases. Typically, suprastructures are either cast or digitally produced cobalt chrome and serve to provide strength within the maxillary prosthesis while in function. If a tapered bar is employed, the suprastructure will have an intimate fit to the bar framework. If a bar with stud-style or Hader/Dolder retentive elements is employed, the suprastructure typically will fit intimately to only a few portions of the bar, and the remainder of the framework will be blocked out to ensure resiliency exists within the prosthetic design. Prostheses that rely upon bar support do not require much-if any-tissue support, and the amount of tissue extension of the suprastructure can be kept to a minimum.
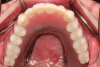
The completed bar and suprastructure are tried intraorally to ensure a properly fitting framework (Figure 4). A one-screw test is employed to verify passive fit of the bar, with the clinician placing one prosthetic screw on one side of the prosthesis and tightening down to verify minimal movement of the framework. The suprastructure and prosthetic tooth arrangement are verified to ensure the patient is satisfied and confirm proper vertical dimension, centric, stability, phonetics, and esthetics. The prosthesis is processed in a conventional fashion by the technician and placed be the clinician (Figure 5). Retentive elements are placed and the patient demonstrates the ability to insert and remove the prosthesis prior to dismissal.
Individual Stud-Style Abutments
Individual stud-style abutments can be successfully utilized with maxillary overdenture restorations. Because of the aforementioned factors, many advocate for the use of four to six implants for many patients. Patients who seek implant overdenture therapy often are primarily interested in eliminating the hard palate coverage of their removable prosthesis.20 The challenge of eliminating or minimizing the hard palate coverage of the overdenture is that a primary amount of support and stability of the prosthesis is derived from the hard palate and eliminating the palatal coverage may potentially lead to overloading of the dental implants. To help minimize the stresses imparted on individual implants with stud-style abutment systems, studies suggest that at least four implants are required for palateless coverage of the maxillary overdenture, with some indicating that more than four may result in optimal long-term outcomes.3,7
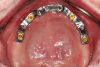
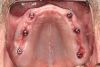
After the implants have been placed, the patient returns for impression procedures and fabrication of the definitive cast. Healing abutments are removed, and definitive stud-style abutments placed (Figure 6). To facilitate technical fabrication procedures of the framework, the clinician places either the housings or a scan body on top of the retentive element prior to impression procedures. An optical scan can be made of the dentition with the housings in place directly using an intraoral scanner (Figure 7). Optical scans of the patient's prosthesis are beneficial; however, it's not critical to fabricating a stud-style overdenture framework as the prosthetic space requirements are not as demanding as bar overdenture restorations.
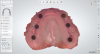
The optical scan files are imported into a dental-specific software, where a framework can be designed using a wizard-like function. Because the stud-style abutment maxillary overdenture is a tissue-supported prosthesis with implant-retention, it is important to carefully design the suprastructure to ensure long-term success of the restoration (Figure 8). A clinician and technician are often faced with a catch-22, because the maxillary hard palate is the primary support/stability factor for the maxillary arch, yet the patient is often motivated by having as little palatal coverage as possible. To meet both expectations, the patient should be informed of the goals of the prosthesis and the benefits and risks of eliminating palatal coverage completely versus minimizing palatal coverage. The former creates a "ridge-runner prosthesis," while the latter creates a "horseshoe prosthesis" with an emphasis on placing as much of the suprastructure on the primary hard palate as possible.
Some technicians prefer to cover the retentive elements of the stud-style abutments in the framework design; however, this can increase the prosthetic space requirements needed. In many cases, retentive elements generally do not need coverage of the framework over the abutment housings and can be avoided. The retentive meshwork of the framework is designed to be slightly off the tissue surface, generally between 0.3 mm and 1.0 mm, to permit acrylic resin to flow underneath during processing procedures. Having minimal contact of the framework on the alveolar ridges permits the clinician to make simple and predictable adjustments of any pressure spots. The retentive element is placed around the abutment housings, which imparts strength, but also permits the clinician to easily adjust recesses with the patient present. In scenarios where the framework was covering the housing and the clinician needed to enlarge the recess more, adjustment procedures can be much more difficult compared to designs where the housings are not covered by the framework.
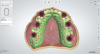
A bead line is scribed on the palatal section to create a seal of the framework to the tissues and the major connector is designed to cover as much of the hard palate as the patient will permit. A finish line is placed on the palatal portion of the major connector and two to four tissue stops are placed in the relieved retentive mesh of the framework to aid in processing the acrylic resin. The framework is exported from the design software and produced using metal additive manufacturing techniques or a combination of additive manufacturing and casting (Figure 9). The framework is evaluated intraorally and typically in combination with denture teeth to assess occlusal vertical dimension, centric, phonetics, and esthetics prior to processing. The prosthesis is completed using conventional acrylic resin processing techniques.
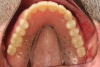
Stud-style abutment maxillary overdentures' retentive elements can be processed to the prosthesis either by the technician or clinician. Attachment processing, or pick-up, is predictable when performed by the clinician chairside. The laboratory-prepared recesses are slightly enlarged using acrylic burs and mechanical undercuts are placed within the prosthesis. Acrylic or composite resin is flowed into the prepared recess and the clinician seats the prosthesis onto the edentulous ridge, ensuring passivity of the prosthesis during attachment processing. After the resin has completely polymerized, the prosthesis is removed, and processing inserts are changed for retentive inserts and the prosthesis placed onto the edentulous ridge. The patient demonstrates insertion and removal of the prosthesis prior to dismissal.
Closing Comments
Clinical and laboratory procedures to design maxillary implant overdenture frameworks often require the clinician and technician to work closely together. Frameworks are highly recommended for maxillary bar-retained overdentures and stud-style abutment systems. Clinical guidelines presented in this article can help provide a roadmap for ensuring a successful long-term outcome for patients wishing for an implant overdenture restoration.
References
1. Kutkut A, Bertoli E, Frazer R, Pinto-Sinai G, Fuentealba Hidalgo R, Studts J. A systematic review of studies comparing conventional complete denture and implant retained overdenture. J Prosthodont Res. 2018;62(1):1-9.
2. Kodama N, Singh BP, Cerutti-Kopplin D, Feine J, Emami E. Efficacy of mandibular 2-implant overdenture: an updated meta-analysis on patient-based outcomes. JDR Clin Trans Res. 2016;1(1):20-30.
3. Sadowsky SJ. Treatment considerations for maxillary implant overdentures: a systematic review. J Prosthet Dent. 2007;97(6):340-348.
4. Guenin C, Martín-Cabezas R. How many implants are necessary to stabilise an implant-supported maxillary overdenture? Evid Based Dent. 2020;21(1):28-29.
5. Heydecke G, Boudrias P, Awad MA, De Albuquerque RF, Lund JP, Feine JS. Within-subject comparisons of maxillary fixed and removable implant prostheses: Patient satisfaction and choice of prosthesis. Clin Oral Implants Res. 2003;14(1):125-130.
6. Esposito M, Hirsch JM, Lekholm U, Thomsen P. Biological factors contributing to failures of osseointegrated oral implants. (I). Success criteria and epidemiology. Eur J Oral Sci. 1998;106(1):527-551.
7. Sadowsky SJ, Zitzmann NU. Protocols for the maxillary implant overdenture: a systematic review. Int J Oral Maxillofac Implants. 2016;31 Suppl:s182-191.
8. Scherer MD, McGlumphy EA, Seghi RR, Campagni WV. Comparison of retention and stability of implant-retained overdentures based upon implant number and distribution. Int J Oral Maxillofac Implants. 2013 Nov-Dec;28(6):1619-28.
9. Damghani S, Masri R, Driscoll CF, Romberg E. The effect of number and distribution of unsplinted maxillary implants on the load transfer in implant-retained maxillary overdentures: an in vitro study. J Prosthet Dent. 2012;107(6):358-365.
10. Leão RS, Moraes SLD, Vasconcelos BCE, Lemos C a. A, Pellizzer EP. Splinted and unsplinted overdenture attachment systems: A systematic review and meta-analysis. J Oral Rehabil. 2018;45(8):647-656.
11. Phillips K, Wong KM. Space requirements for implant-retained bar-and-clip overdentures. Compend Contin Educ Dent. 2001;22(6):516-518, 520, 522.
12. Lee CK, Agar JR. Surgical and prosthetic planning for a two-implant-retained mandibular overdenture: a clinical report. J Prosthet Dent. 2006;95(2):102-105.
13. Drago C, Howell K. Concepts for designing and fabricating metal implant frameworks for hybrid implant prostheses. J Prosthodont. 2012;21(5):413-424.
14. Goodacre CJ, Bernal G, Rungcharassaeng K, Kan JYK. Clinical complications with implants and implant prostheses. J Prosthet Dent. 2003;90(2):121-132.
15. Di Francesco F, De Marco G, Sommella A, Lanza A. Splinting vs not splinting four implants supporting a maxillary overdenture: a systematic review. Int J Prosthodont. 2019;32(6):509-518.
16. Scherer MD. Presurgical implant-site assessment and restoratively driven digital planning. Dent Clin North Am. 2014 Jul;58(3):561-595.
17. Burns DR, Unger JW, Coffey JP, Waldrop TC, Elswick RK. Randomized, prospective, clinical evaluation of prosthodontic modalities for mandibular implant overdenture treatment. J Prosthet Dent. 2011;106(1):12-22.
18. English CE. Critical a-p spread. Implant Soc. 1990;1(1):2-3.
19. Parel SM, Phillips WR. A risk assessment treatment planning protocol for the four implant immediately loaded maxilla: preliminary findings. J Prosthet Dent. 2011;106(6):359-366.
20. Zembic A, Tahmaseb A, Wismeijer D. Within-subject comparison of maxillary implant-supported overdentures with and without palatal coverage. Clin Implant Dent Relat Res. 2015;17(3):570-579.