You must be signed in to read the rest of this article.
Registration on CDEWorld is free. You may also login to CDEWorld with your DentalAegis.com account.
Implant-supported and retained full dentures are a generally accepted treatment option with which most dental laboratory technicians are very familiar. The term “implant retained” refers to cases where the denture is retained by attachments to the implant but is still supported by mucosa, while an “implant-supported” complete denture is completely retained and supported by the implants without any mucosal buttressing.1
This article describes a case of an implant-supported denture created using a novel attachment approach called SynCone2 through the ANKYLOS® Implant System by DENTSPLY, which has been updated with the use of ATLANTIS™ custom abutments, also by DENTSPLY. The case involved immediate placement of five submerged ANKYLOS implants in the mandible with the concomitant insertion of an immediate full denture. After osseointegration of the implants was confirmed by the implant surgeon, the immediate lower full denture was converted into an implant-supported one using the SynCone method.
The Procedure
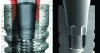
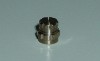
The first step in this conversion was to take a transfer impression of all five implants in the mouth using ANKYLOS transfer abutments (Figure 1). This impression was sent to the dental laboratory, where it was used to fabricate the ATLANTIS custom abutments that would serve as the underpinnings for the SynCone attachments (Figure 2). The ANKYLOS system is unique in that it does not require any kind of hexed connection for its abutments, as its Morse taper is engineered to such intimate tolerances that this connection is both anti-rotational and exceptionally stable.3 The abutments come in either indexed or non-indexed versions, with the former being used for positioning purposes only (Figure 3). An advantage of the non-indexed version for this situation is that it allows for an infinite location of the abutment around the 360 degrees of possible positions on the implant. This allows for the easy development of a path of insertion for the denture’s attachment onto the implant abutments.
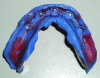
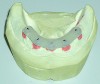
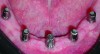
Once the laboratory reported that it had completed fabrication of the custom abutments and their retention cap attachments (Figure 4 and Figure 5), an impression was taken in the mouth using the original immediate denture. The intaglio of the original immediate denture had been modified by the implant surgeon to accept the presence of the healing abutments—called “sulcus formers” in the ANKYLOS system—placed when the implants were uncovered after osseointegration (Figure 6 and Figure 7). This impression was used at the laboratory to orient further adaptations of the denture’s intaglio to receive the retention cap attachments that would integrate with the custom abutments and the system’s stabilizing bar (Figure 8). Simultaneous to abutment fabrication, the laboratory created a mounting jig to correctly position the abutments on the implants and provide a proper path of insertion as required for the non-indexed abutments (Figure 9). The denture and its SynCone components were then returned to the author’s office for the final chairside denture insertion procedures.
Accurate execution and communication between the laboratory and the dental office regarding the technical issues is essential to facilitating smooth completion of the case. Proper sequencing and implementation of the final chairside denture insertion procedures are dependent upon it. The first of these steps is orienting the custom abutments onto the implants in the mouth. The mounting jig fabricated at the laboratory must fit the abutments so intimately that it allows the dentist to carry them to the mouth without any of them exiting in the process. Putting the abutments loosely on the implants in the mouth and then trying to rotate them individually until the jig fits onto them to assure proper positioning is an extremely unwieldy, haphazard, and protracted undertaking that the dentist wants to avoid (Figure 10).
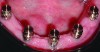
After the abutments have been appropriately situated on the implants with the mounting jig in the mouth, the dentist will hand tighten them in place through the mounting jig (Figure 11). At this point, the retention cap attachments can be placed on the abutments to confirm a secure fit, and the denture can be tried in to validate that the adaptations of the denture’s intaglio made at the laboratory for the attachments are adequate. The dentist does this by verifying that there are no occlusal discrepancies or rocking of the denture in the mouth.
Once these parameters have been substantiated, the next step is to secure the retention cap attachments inside the denture with cold-cure acrylic. First, however, the abutments must be completely torqued onto the implants with the implant system’s driver. It is absolutely crucial to advise the dentist that this procedure must be done with the mounting jig in place as the ANKYLOS system’s Morse taper does not become anti-rotational until its abutments have been torqued in place. Thus, torqueing the abutments in place without the mounting jig can result in micro-movement of one or more of them that will disrupt the path of insertion and render the denture unseatable.
Once the abutments have been torqued into place and their screw holes have been sealed with composite over an intermediate restorative material such as Fermit, the retention cap attachments can be seated on them to start the incorporation of those attachments into the denture with cold-cure acrylic (Figure 12 and Figure 13). Here, too, precise communication between the laboratory technician and the dentist is vital, especially if the dentist does not routinely perform cold-cure acrylic procedures. The laboratory technician should advise the dentist to mix the acrylic to a softer consistency so that he or she has sufficient working time for integrating multiple retention cap attachments within the denture. Acrylic that has begun to set as the denture is settling onto them will not bond effectively and can result in inadequate retention, especially considering the intimate fit achieved between the retention cap attachments and the custom abutments in this system. Also, the dentist should be instructed to load the acrylic into the adaptations of the denture’s intaglio created by the laboratory and not onto the heads of the conus attachments in the mouth (Figure 14). Doing the latter can result in slumping of the acrylic, which might not allow those adaptations to be totally filled, which can compromise retention.
After the acrylic has set, the dentist removes the denture from the mouth with the retention cap attachments contained within it. The acrylic is then trimmed and polished by the dentist so that any excess beyond the adaptations of the denture’s intaglio created by the laboratory are removed and any voids within them are filled with either more cold-cure acrylic or flowable composite. The former is important to prevent mucosal irritation that may occur on seating or removal of the denture, and the latter is necessary to avoid trapping of food particles that may be difficult to clean out. Once these chairside procedures have been accomplished, the denture is ready for daily use (Figure 15).
Again here the laboratory technician should be proactive in informing the dentist about possible issues after the chairside denture insertion procedures have been completed. In particular, the dentist may find that the strength of retention achieved using the SynCone may create extreme difficulty in removing the unit to the point that, in some cases, it may be almost impossible. The technician should make the dentist aware of this possibility in advance and recommend that the inside of the conus attachments be coated with petroleum jelly upon insertion to ease later removal. It may also be advisable to do this during the cold-cure acrylic process of chairside denture insertion procedures.
Conclusion
The unique approach the described system applies to implant-supported full denture treatment affords the dentist many advantages over other methods. Most notably is the degree of retention that can be achieved, which has been shown to be comparable to that of other attachment systems4 and is the greatest in this author’s over 20-year experience with implant-supported prostheses. It also is easier for patients to clean freestanding implant abutments than those connected by a bar, thus improving their ability to perform oral hygiene procedures. In addition, because the bar is contained within the denture base, the possibility of its corroding in the mouth is virtually eliminated.5 For the laboratory technician, the procedures involved using this system are simpler and more easily performed than those involving bars that are milled or manufactured through spark erosion, which makes these cases less costly. Once the dental office and the laboratory have gained some experience, these cases become more predictable than the other commonly used approaches, offering a highly effective, implant-supported full denture treatment.
Acknowledgements
The author would like to thank Dr. James Spivey for his expertise in dental implant surgery with this case. The author would also like to thank Mr. David Avery and his talented team of technicians at Drake Dental Laboratory for the removable prostheses and laboratory implant procedures described in this article.
References
1. Kreyer R. Implant retained overdentures. Dent Lab Prod. 2007;1:30-31.
2. Taiyeb-Ali TB, Toh CG, Siar CH, et al. Influence of abutment design on clinical status of peri-implant tissues. Implant Dent. 2009;18(5):438-446.
3. May D, Romanos G. Immediate implant-supported mandibular overdentures retained by conical crowns: A new treatment concept. Quintessence International. 2002;33(1):5-12.
4. Zhang RG, Hannak WB, Roggensack M, Freesmeyer WB. Retentive characteristics of ANKYLOS SynCone conical crown system over long-term use in vitro. Eur J Prosthodont Restor Dent. 2008;16(2):61-66.
5. Waddell JN, Payne AG, Swain MV, Kieser JA. Scanning electron microscopy observations of failures of implant overdenture bars: a case series report. Clin Implant Dent Relat Res. 2010;12(1):26-38.
About the author
Barry F. McArdle, DMD
Private Practice
Portsmouth, NH
Cofounder
Seacoast Esthetic Dentistry Association
Founder
Seacoast Dental Seminars