You must be signed in to read the rest of this article.
Registration on CDEWorld is free. You may also login to CDEWorld with your DentalAegis.com account.
The dental industry is witnessing a rapid increase in digital workflows, especially in removable dentistry. At Zahntechnique, we’ve observed a notable rise in digital cases over the past 1 to 2 years driven by several technological, clinical, and economical factors. The reasons are advances in digital technologies such as improved accuracy to intraoral scanners, CAD/CAM systems, 3D printing, and artificial intelligence (AI). Improved efficiency and speed allow for faster turnaround times, fewer appointments, and reduced chances of human error or inconsistencies. Patients are experiencing greater comfort due to the elimination of bulky impressions. Digital records deliver more consistency and reproducibility with easy storage and retrieval for remakes and repairs. Additionally, digital workflow integration with cone-beam CT and digital scans support precise implant placement for overdentures.
However, many clinicians and technicians still face uncertainty when it comes to choosing between analog and digital workflows. These concerns often stem from unfamiliarity with new techniques and materials. This article aims to address those concerns by providing a step-by-step comparison of analog and digital workflows in removable dentistry.
Our objective is to help dental professionals feel confident when starting a removable case by understanding the proper steps—from impressions, custom trays, wax rims, try-ins, finalization, to insertion—in both analog and digital workflows. It’s important to remember: Digital and analog are complementary, not mutually exclusive. A solid understanding of analog techniques is essential for successful digital implementation.
Close collaboration between dental labs and clinics is critical for protocol refinement and treatment success. Effective communication and proper treatment planning are the cornerstones of successful outcomes in both approaches.
We work with real people who are missing teeth and want to smile again. Our job is to restore their confidence and quality of life.
Evolution of Removable Dentistry
Removable dentures come in various forms: complete, partial, immediate, and implant-supported. These can be fabricated using analog, digital, or hybrid (digi-log) methods—blending the best of both worlds.1
Historically, analog methods required manual impressions, bite registrations, and wax setups—all time-consuming and labor-intensive steps. Today, digital evolution allows for the integration of digital records, CAD/CAM workflows, 3D-printed prototypes, and digitally fabricated final dentures.
Looking forward, we anticipate more use of AI-assisted diagnostics and design, hybrid workflows, and advanced materials with improved esthetics, strength, and biocompatibility.
However, digital dentistry still faces challenges, such as:
• Learning CAD/CAM software
• Mastering intraoral scanning
• High initial investment costs
• Equipment maintenance and software updates
• Esthetic limitations
• Anatomical restrictions (eg, limited mouth opening)
• Constant equipment improvements lead to the need for many new investments
The appointment breakdown for analog removable dentistry consists of five clinical appointments and four laboratory steps. In digital removable dentistry, three appointments are needed if there is an existing denture present and four appointments for edentulous cases with no denture present.
Step-by-Step Comparison: Analog Vs Digital Dentistry
1. Initial Records – Impressions
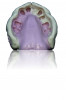
Preliminary impressions are the first impressions of the patient’s dentition to be taken, usually during the initial stage of treatment or as a helpful tool for diagnostic treatment. These impressions will be used to create models for the fabrication of custom trays, which are used to make accurate final impressions. The purpose of these impressions is to record the exact form and placement of the edentulous ridge, soft tissue, and other anatomic landmarks (Figure 1). As impressions are the foundation of any successful dental restoration, all landmarks must be accurately captured. Impressions can also be border molded with a modeling compound.
Intraoral scans are digitally capturing patients’ oral anatomy, soft tissue, and other important landmarks. They are then converted into an STL file.
Scanning an existing denture is typically done by using an intraoral scanner outside the patient’s mouth to capture both tissue sides (intaglio) and the outer surface (cameo). This helps in replicating a well-functioning denture as it gives a reference point for the tooth positioning, occlusion, vertical dimension, and esthetics for the digital design without having to take new intraoral scans.
In analog dentistry, preliminary impressions are taken during the first appointment (Figure 2). These are the initial impressions of patients’ teeth and surrounding oral tissues. The most commonly used materials used for these impressions are alginate (irreversible hydrocolloid), which provides sufficient accuracy for diagnostic models.
With digital dentistry, the impression technique is different. Start by drying the mouth and retracting tissues, then use a consistent scanning pattern, starting from a fixed landmark. Evaluate and rescan missing areas if needed.
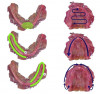
When scanning the mandible, begin at the ridge’s midline, move to lingual areas, the frenum, retromolar, pads, and then the buccal vestibule (Figure 3). When scanning the maxilla, start at the papilla and rugae, moving in a wave-like motion across the palate, capturing the hamular notch, vestibule, and then other key landmarks.2
2. Bite Registration (VDO)
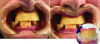
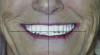
In analog dentistry, wax rims are more commonly used to adjust the vertical dimension of occlusion (VDO), then we use that to mark the midline, smile line, and canine position (Figure 4). The wax rim consists of a record base and occlusal rim, which helps to determine the VDO. Accurate registration of the VDO helps determine the correct jaw relationship, which allows for a more predictable teeth setting and better functional and esthetic results.3
Bite registration is essential for accurate occlusion and esthetics. The doctor must adjust the bite block and take measurements, rather than returning it untouched. Facial analysis and landmarks help position the central incisors and define arch height (typically ~22 mm upper, ~18 mm lower).
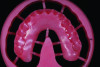
For digital dentistry, we use printed bite blocks. Adjustments are made and then the bite blocks are scanned.
Digital bite registration mirrors the analog workflow but also includes the scanning of adjusted bite blocks. Wash impressions are taken of intaglio surfaces for tissue compression prior to the scanning (Figure 5).
If an existing denture is present, this can be helpful for the digital workflow. Even if the denture is not ideal, it can be used as a reference for VDO and tooth positioning.
The clinician will take a wash impression with the existing denture and scan extra-orally with the intraoral scanner 360° around that denture, utilizing the same scan pattern as intraorally for edentulous arches.
3. Tooth Setup
In analog dentistry, we utilize manual tooth placement, festooning, and then proceed with an esthetic wax try-in.
Manual tooth placement is the process of positioning artificial teeth in wax on a denture base by hand. Each tooth is selected and placed individually into the wax base plate in alignment with the dental arch according to the bite and esthetic requirements. Placement of teeth follows guidelines based on the patient’s jaw relation, alignment on the midline, lip support, smile line esthetics, and functional occlusion.4 During the esthetic try-in, the clinician and the patient assess the appearance of tooth shape and shade, color, and alignment for the overall denture. At this point, changes can still be made easily in the wax.
Wax festooning involves sculpting a wax around a denture tooth to create a natural gum appearance and its contours. The process makes the denture look more natural and it can then serve as the model for precise final acrylic processing.
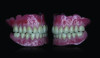
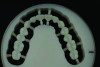
When using digital dentistry, teeth are set virtually using cast articulation and 3D-printed prototypes are created.
The virtual setting of teeth in digital dentistry works as a replacement for doing manual tooth set up, with the use of a CAD/CAM system. Some widely used software includes DentalCAD (exocad, exocad.com), 3Shape Dental System (3Shape, 3shape.com), DentalWings (dentalwings.com), and Zirkonzahn (zirkonzahn.com).
After scanning patients’ impressions, or taking intraoral scans, 3D models of the edentulous arches are created. The software provides a database of pre-designed artificial teeth in various shapes and sizes. The teeth at this point are virtually arranged using the same guidelines as in analog workflows. The software uses patient data to optimize occlusion and function. Some software even offers automatic or semi-automatic tooth alignment. Once the digital setup is created and approved, the prototype is then printed. Prototypes are printed in biocompatible resin and can be stained if needed.
Both digital and analog methods follow anatomical and occlusal principles (ie, the Curve of Spee and the Curve of Wilson) (Figure 6). In digital workflows, tooth setup is done virtually but adheres to the same biomechanical and esthetic considerations.5,6
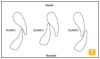
An important aspect to keep in mind when completing the functional and esthetic tooth set up, is taking Angle’s classifications into consideration (Figure 7)7:
• Class I – Neutrocclusion – Normal molar relationship
• Class II – Distocclusion – The mesiobuccal cusp of the maxillary first molar occludes the anterior to the buccal groove of the mandibular first molar.
• Class III – Mesiocclusion – The mesiobuccal cusp of the upper first molar falls posterior to the buccal groove of the lower first molar.
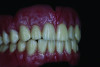
4. Try-In Appointment
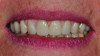
During an analog try-in appointment, the dentist will check the bite, occlusion, and esthetics of the denture. At this stage, chairside adjustments are possible (Figure 8).
The analog try-in appointment confirms the proper alignment of the midline, smile line, and incisal edge position as well as confirming lip support and function. The doctor also evaluates phonetics, occlusion, and VDO at this point. At this time, photographs can also be taken for reference, which are critical for the lab. It is suggested to take photos of the natural full face, a smiling picture, and a retracted image for a complete reference.
Records are taken for any changes that must be made, including a new bite registration. Then the dentures are sent back to the lab, either for a second try-in appointment or for final processing. The try-in appointment allows the patient to get involved with the final approval with regards to esthetics and comfort.
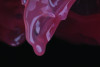
Using digital techniques at this stage, the try-in prototype is created in biocompatible resin. Adjustments are marked and the occlusion is adjusted. Extraoral scans or notes are submitted (Figure 9).
The digital try-in appointment with a monolithic printed prototype replaces the traditional wax try-in setup. Just as with the analog wax try-in, at this stage fit, function, phonetics, vertical dimension, occlusion, and phonetics are all confirmed. If adjustments are needed, intraoral or extraoral scans can be taken and sent back to the lab for CAD revisions of a modified prototype. If a second try-in is needed, the prototype try-in would be repeated. If everything is approved by the patient and the dentist, the technician can proceed to final denture fabrication.
The advantage of using a 3D-printed prototype is the ability to mark changes and adjust without the risk of moving teeth in wax. It is more stable for try-ins and for communication with the laboratory. In questionable cases, multiple different prototypes can also be printed.
5. Final Denture Fabrication
For the final stages of a denture fabrication, the denture is flasked, processed (with a heat or cold cure), polished, and then inserted.
The wax set-up is invested in a dental flask using a dental stone. Once this stone sets, the wax can be boiled out to create a negative mold of the denture. Heat-cured denture acrylic is mixed and packed into the mold, and now it’s ready for the final curing. After heat curing, the denture is very carefully deflasked, finished, and polished.
At this stage within the digital dentistry workflow, the final scan is taken and CAD adjustments are made. Here, technicians have an option to choose between milling with pre-shaped PMMA (pre[methyl methacrylate]) blocks or 3D printing. If utilizing 3D printing, the teeth and base can be printed separately, or an integrated base and teeth can be printed together.
After final assembly, there is also the option of completing staining, glazing, and/or characterization, followed by insertion (Figure 10).
When milling the final denture, the adjusted designs are nested via compatible nesting software, so that the machine can mill the pink base and the teeth out of high-impact PMMA blanks. This can be done with a dry or wet mill, depending on the system (ie, Ceramill [Amann Girrbach, amanngirrbach.com], CEREC MC XL [Dentsply Sirona, dentsplysirona.com], DGSHAPE [Roland DGA, dolanddga.com]) (Figure 11 and Figure 12).
After milling, the teeth are going to be processed into the pink base by utilizing a pink cold-cure acrylic. Finalization is done with a traditional polishing process. Upon request, characterization by utilizing light-cure stains can be achieved as well.
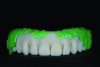
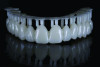
Using 3D printing (with printers such as Asiga [asiga.com], Form 4B [Formlabs, dental.formlabs.com], and NextDent 5100 [NextDent, nextdent.com]), the adjusted designs are nested via compatible nesting software for the chosen printer system. The base is printed in a high-impact pink resin and the teeth are printed in a high-impact tooth resin (Figure 13 and Figure 14). Our industry is currently experiencing a very strong evolution in additive manufacturing, meaning that improved resin options are constantly being released.
The post-processing of 3D-printed dentures is, by far, more crucial than with milled dentures. Proper safety precautions, including using personal protective equipment (PPE) and working in well-ventilated areas, are vital when handling uncured resins as they are toxic in this state.8,9 Cleaning is done via an isopropyl alcohol bath and the resin manufacturers’ instructions. Before the final curing process, the teeth and pink base are bonded together utilizing the fluid pink resin, which is applied into the tooth sockets in the base and tack-cured after removing the excess resin. Then the 3D-printed denture is final cured in accordance with the resin manufacturers’ instructions.6,10 The 3D-printed denture is finished once it is light-cure stained and glazed (Figure 15 and Figure 16).
Generally speaking, there are many pros and cons to using 3D printing vs milling, and vice versa:
3D Printing:
• Pros: Faster, consistent fit, reproducible, strong, less labor-intensive
• Cons: Brittle, monochromatic, toxic resin handling (masking, gloves, protective clothing, eye wear), equipment-heavy
Milling:
• Pros: Esthetics, consistency, strength, less labor-intensive
• Cons: Expensive equipment, high material cost, milling itself is time-consuming
The decision of which method and technique to use often comes down to the preferences of each technician and clinician, the available machinery at the lab, etc.
Some hybrid methods also allow for combining printed or milled bases with stock denture teeth or the use of monolithic pucks.
Final Thoughts
Ultimately, there is no digital dentistry without knowing and understanding analog dentistry. While digital technology has significantly transformed the workflow of removable dentistry, it cannot fully replace the fundamental principles of analog dentistry. A successful digital workflow still relies heavily on the clinician’s understanding of traditional analog protocols, from impression making to occlusal relationship esthetics and functional principles. Digital tools enhance and streamline processes, but they do not change the biological, anatomical, and mechanical realities of the oral environment. Without a solid foundation in analog techniques, a clinician cannot accurately interpret or validate the digital data, nor can they recognize when digital tools fall short and require manual intervention. The knowledge of analog techniques provides the critical thinking, diagnostic skills, and problem-solving abilities necessary to navigate both workflows successfully. As always though, successful outcomes require thorough planning and close collaboration between the lab and clinician.
In modern removable dentistry, the future belongs to those who master both worlds and know when to integrate them for their patient’s best outcome. Multiple paths can lead to the same destination. Choose what works best for your workflow, your patient, and your lab.
About the author
Veronika Kreckova, CDT
Removable & Implant Removable Department Manager
Zahntechnique, Inc.
Miami, Florida
References
1. El Osta, Bessadet M, Drancourt N, Batisse C. Time efficiency and cost of fabricating removable complete dentures using digital, hybrid, and conventional workflows: a systemic review. J Prosthet Dent. 2025;133(5):1194-1208.
2. Kelsey CC. Important Anatomic Structures of Edentulous Maxillary Arch and Corresponding Landmarks on Final Impression. University of Michigan School of Dentistry. Complete Denture Department. Accessed July 31, 2025.
3. Bonk J. Taking the ‘Voodoo’ Out of Vertical Dimension of Occlusion. Spear Education. https://www.speareducation.com/spear-review/2019/05/taking-the-voodoo-out-of-vertical-dimension-of-occlusion. May 24, 2019. Accessed June 13, 2025.
4. Guidelines for Posterior Denture Teeth. Spear Education. https://www.speareducation.com/spear-review/2016/06/guidelines-for-posterior-denture-teeth#:~:text=Avoid%20using%20cusps%20any%20steeper,destabilizing%20interferences%20during%20denture%20articulation. June 22, 2016. Accessed July 28, 2025.
5. Lynch CD, McConnell RJ. Prosthodontic management of the curve of Spee: use of the Broadrick flag. J Prosthet Dent. 2002;87(6):593-597.
6. Barrera JM, Llamas JM, Espinar E, et al. Wilson maxillary curve analyzed by CBCT. A study on normocclusion and malocclusion individuals. Med Oral Patol Oral Cir Bucal. 2013;18(3):e547-552.
7. Yadav D, Rani MS, Shailaja AM, et al. Angle’s molar classification revisited. J Ind Orthod Soc. 2014;48(4):382387.
8. Wiertelak-Makała K, Szymczak-Pajor I, Bociong K, Śliwińska A. Considerations about cytotoxicity of resin-based composite dental materials: a systematic review. Int J Mol Sci. 2023;25(1):152.
9. Is Resin Toxic? Top 3D Printing Safety Precautions. Inslogic. https://www.inslogic3d.com/blogs/blog/is-resin-toxic-top-3d-printing-safety-precautions. May 16, 2024. Accessed June 12, 2025.
10. Guerrero-Gironés J, López-García S, Pecci-Lloret M, et al. In vitro biocompatibility testing of 3D printing and conventional resins for occlusal devices. J Dent. 2022;123:104163.